Showing posts with label java. Show all posts

Sunday, July 13, 2008

Eclipse Ganymede ECF review

This post is one of a number of reviews of the Eclipse Ganymede release. It has been added to the Ganymede Around the World map. Donate and become a Friend of Eclipse!

One of the projects that is part of the Ganymede simultaneous release is the Eclipse Communication Framework (ECF). I had never done anything with it before, so writing a review is a great chance to actually do something with it. The update site for getting is ECF is:

http://download.eclipse.org/technology/ecf/2.0/3.4/updateSite/site.xml


One of the things you will get is a communication perspective. In this perspective, you have the following two buttons, the first one for connecting to an IM provider, the second one for connecting to a collaboration server. In this review I will focus on the XMPP connectivity available under the "Connect to Provider" button. XMPP is the protocol used by Jabber and GTalk, and I happen to have two GTalk users (one is for XMPP testing purposes for some components I made using the Smack API).


The "Connect to Provider" and "Connect Workspace to Collaboration Group" buttons

To connect to e.g. GTalk or another Jabber server, select the XMPP provider. This requires you to enter your user name, the XMPP server and the port number where the XMPP server resides. In the case of GTalk you will only have to enter username@gmail.com. It will then connect to the default port 5222 and authenticate with the given user name.


The "New XMPP Connection" dialog where you can enter the XMPP connection string

Once connected, you will see the the contacts view appear with the list of your GTalk buddies. Double click a buddy and you can happily start chatting from within Eclipse. One of the drawbacks that I see here is the fact that you must be in the communication perspective (or add the communication buttons to your Java perspective). The communication views themselves do not provide buttons for connecting and are just a gray area with some explanatory text. This is something that could be done better I think. I would expect a list of accounts and the ability to add accounts via a context menu in a view, much like the server view of the JEE tooling.


GTalk buddies in the contacts view

There is also no way of automatically connecting (see bug 181510), requiring me to continuously go through these steps in order to connect. Furthermore, the XMPP connect dialog only allows user@host for both the user name (used for authentication) and the server name. I can foresee problems here, as with Jabber/ XMPP the domain used for authentication is not necessarily the server name you connect to.

You can collaborate with your Jabber/ GTalk buddies via XMPP. You can send URL's, screen captures, files, etc. from within the contacts view by right clicking a buddy. Sending URL's via XMPP requires the receiver's permission before it is opened, which is a good thing in case a malicious user were to send out links to malicious websites. When using the ECF collaboration server, there are no such controls in place, causing the web site to immediately appear in the receiving Eclipse.

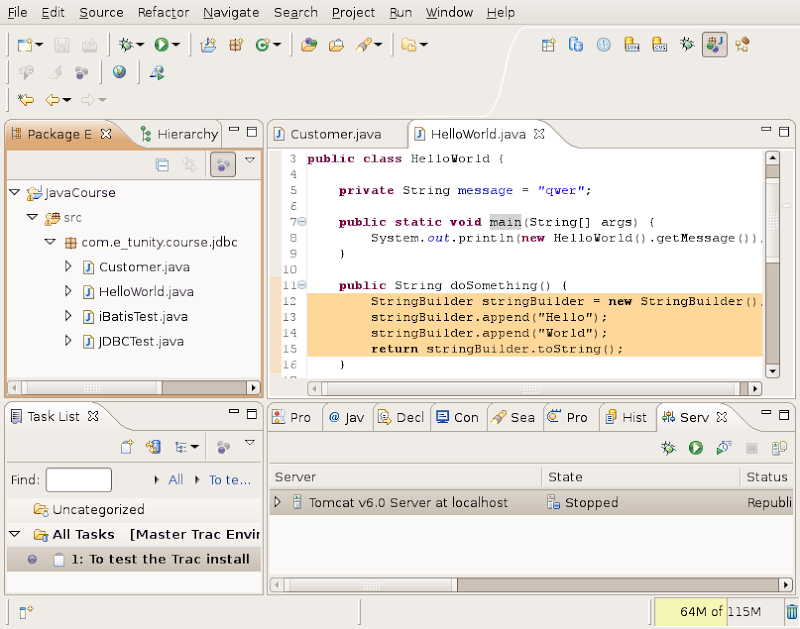
To share an editor via XMPP, right click in the editor, select "Share Editor With" and navigate to a buddy. The receiver is now asked permission and upon acceptance the shared editor is opened. Changes in one editor are propagated to the other. The following screen cast shows the simultaneous update of the two editors in action (or click here if it does not display):


Click the play button to see a screen cast of the two shared editors being updated in sync


Conclusion

ECF looks promising when using the XMPP provider. It allows you to use your existing IM accounts in Eclipse and provides collaboration features such as shared editors. This comes in handy for distributed teams or in case you deal with home workers (like I do). The ability to connect to your existing buddies and get all these collaboration features inside the IDE is nice.

Now for the bad: The way things are presented is IMO not the best and could use quite a bit of rework. It is usable, just not very user friendly yet. The way XMPP user names and server names are entered might cause problems for some Jabber installs, e.g. in case you have "username@some.group" as user ID and the server name is "myjabberserver.com". ECF uses the Smack API for XMPP connectivity, and that API does not support HTTP proxies yet (a request that is outstanding for quite some time now). This will require you to do some tunneling in case you are behind a firewall. Receiving screen captures does not require permission from the receiver.

Some of these issues are minor, some are not. There is a lot of room for improvement. The project has sparked my interest though, and I will follow its progress and hope to see those improvements in future releases.

Saturday, June 28, 2008

Eclipse Ganymede w00t DTP review!

This post is one of a number of reviews of the Eclipse Ganymede release. It has been added to the Ganymede Around the World map. Donate and become a Friend of Eclipse!

First an update and apologies for not posting more Ganymede stuff. I've been very, very, very busy lately, which is too bad as I don't get a chance to dive some more into Ganymede. As for the update: I have downloaded the Ganymede release train now, so no more release candidates, no more mister nice guy! This is where the rubber meets the road and the metal meets the meat ;-)

This time I'm posting about something that really rocks! I haven't had a chance to do much with DTP before. I always used external tools such as pgAdmin III, TORa and TOAD or the plain old SQL clients such as psql, sqlplus and gqlplus. I also tend to ask a database developer to do stuff for me instead of doing it myself. That is much safer, considering the fact that any queries I try to produce are amongst the worst the DB guys have seen! I can vividly recall the grimaces on some of their faces when confronted with my queries, full of devilish distincts, sneaky subselects, arduous aggregations and unwieldy unions!

But as I had just posted bugzilla 238890 on the use of the "Run" menu and toolbar for SQL queries, I decided to dig some more into DTP. I had seen some references to a query builder, something I have never seen in Eclipse before. As googling did not yield any immediate results as to how to use this thing or what it looks like, I decided I would take the plunge and try to get this thing to work.

The way to get the visual SQL query builder working in Eclipse is straightforward: create a SQL file and select a database, right click in the SQL editor, select "Edit in SQL Query Builder..." and lo and behold:


Visual SQL query builder in Eclipse Ganymede

This thing works remarkably well! Resizing the tables is a bit quirky, but a graphic display of the selected tables, joining them using drag and drop from FK to PK, selecting the fields, applying order, etc.!? I was astonished! I knew DTP had gotten better, more stable and more mature, but I did not realize that DTP had gotten to the level of visually building SQL queries already!


Conclusion

I really appreciate the things the DTP developers have achieved. I am no longer using external tools such as pgAdmin to do my database work. I can work on most of the things from within Eclipse without having to switch to external programs. I can create my SQL scripts in Eclipse, check them in to version control from within Eclipse and I can run them in Eclipse as well. All of this in one integrated package. This makes me very happy!

Sure, it's not the most polished database tool out there and there is lots more that can be done better. But the matter of the fact is that I can live with quirks if the component works good enough and empowers me to do more stuff in Eclipse itself rather than having to rely on external programs. The more I work with DTP, the more I feel this is the case. And that, my Friends of Eclipse, is a really good thing!


Saturday, June 14, 2008

Eclipse Ganymede RC3 and the JBoss WTP Plugin

This post is one of a number of reviews of the upcoming Eclipse Ganymede release. It has been added to the Ganymede Around the World map. Donate and become a Friend of Eclipse!

First a little update on my Eclipse environment and Geronimo. I am running Eclipse Ganymede RC3 now, downloaded from the Friends of Eclipse mirror. I have also tried to install and run WebSphere Community Edition (based on Geronimo) in Eclipse, and that failed miserably as well...


Starting to get used to servers failing to start, this time WebSphere CE

But let's discuss running JBoss in Eclipse WTP. Adding a JBoss server is pretty straightforward and involves creating a JBoss runtime and selecting a location where JBoss is preinstalled. I still had JBoss 4.2 lying around somewhere, so that's the one I used. Once JBoss is installed, it runs out of the box.

Problems start when you change the port number in the server configuration from within Eclipse. Sometimes I have multiple servers (sometimes running at the same time), and port 8080 is already in use. So what does one do in such a case? One configures JBoss to run on a different port. Just open the server and change the HTTP port 8080 into 8090 and the RMI port 1099 into e.g. 1109, just like when configuring a Tomcat server to run on a different port. Unfortunately this does not work. You can start the server, it will start allright, but then the plugin somehow fails to see the server and kills it.


Error when the port number of the JBoss server is changed in Eclipse

This same problem appeared in the Europa release and I decided to dig into the problem some more. It seems that changing the port number in the server configuration page in Eclipse does not actually change the port number of the JBoss at all. It just tell the plugin that it should look at that port number to see if there's a JBoss running there. If I connect to localhost 8090 the connection is indeed refused, and instead JBoss is still running on port 8080. The server configuration inside the JBoss install directory still reflects port 8080 as well, so that explains a lot.

The JBoss plugin does not support having the server configuration in the Eclipse workspace (as far as I can tell). That means hacking or going about the old fashioned way of adding servers in the jboss/server directory and then selecting that configuration. I was hoping this could be done from within Eclipse without having to touch the JBoss install, but as far as I can see this can't be done.

Tomcat does support having the configuration outside the Tomcat install directory. This helps a great deal in case you had installed Tomcat using a package management system. In that case the ownership of the Tomcat install by default denies access to the files. Having the Tomcat configuration in the Eclipse workspace means you can avoid having to add yourself to some Tomcat group and manually changing the Tomcat install directory permissions to group writable.


Conclusion

This is a case where one WTP plugin behaves differently from the other. In the case of Tomcat, setting the port number in Eclipse changes the port number of the actual Tomcat server configuration (which can be held in the workspace), causing it to actually listen on the port specified in Eclipse. Setting the port number for JBoss in Eclipse does not change the actual JBoss port number. It only instructs the plugin to try to connect to JBoss using that port.

If you want to run JBoss, be aware of this. In case you only have one JBoss server that runs everything you have, you'll just want to leave it on port 8080. If you have multiple and different kinds servers, JBoss being one of them, you may want to have JBoss running on port 8080 and the others on different ports. In case this is not feasible, add configurations in the JBoss server directory and configure the correct ports there as well as in Eclipse.


Thursday, June 12, 2008

Server Runtime Problems in Eclipse Ganymede RC2

This post is one of a number of reviews of the upcoming Eclipse Ganymede release. It has been added to the Ganymede Around the World map. Donate and become a Friend of Eclipse!

After such a good start with Ganymede RC2, today was a bad day getting stuff done. I have tried to run various server runtimes, and I am not at all pleased at the current state of affairs with the web tools. Let's start where I left of in my previous post: I was to install Geronimo and see if things on the web tools front were improved. Geronimo comes with lots of cool Apache stuff such as ActiveMQ, so I want to develop using that app server in Eclipse.


Additional server runtimes available for Eclipse

When creating a server, you can opt to download additional runtimes such as GlassFish, Geronimo, WebSphere, etc. I see different versions of Geronimo, but I also see a "core package". I am a bit confused here as to what I am supposed to do. I guess I need both the core package and one of the server versions, so I select both the core package and version 2.1. After specifying a target directory, it downloads the stuff and installs it, or so I thought. Much to my surprise, Geronimo could not be selected as a server yet. It seemed that only the core packages were installed. I had to go through the additional runtime download again, this time only selecting the server. I was now able to add the Geronimo server and decided to add my test web project to it as well while it is prompting me for it. So far so good.


Download and install of Geronimo from within Eclipse

At this stage I want to start the server, but things go wrong from here. It just says that "the server failed to start". There are no additional details in the error log whatsoever. I tried to start Geronimo using bin/gsh geronimo/start-server from within the directory I had selected in Eclipse. This crashes due to some missing dependency. So maybe I did something wrong? Well, after this, I downloaded the minimal Tomcat/ Geronimo 2.1.1, unpacked it and started it without any problem whatsoever using bin/gsh geronimo/start-server. It happily reports "Geronimo Application Server started", so it is most certainly not something I am doing wrong.

Maybe if the download from within Eclipse is somehow incorrect, I can try using that Geronimo I had downloaded myself? Unfortunately no. Creating a server that uses the manually downloaded Geronimo fails, and again it just says that "the server failed to start". No log entries whatsoever. I finally tried to install the plugins manually from Apache's update sites. This informs me that there are all kinds of problems with the dependencies, and I get a feel that this could very well be related with the failure of the server to start. So much for my enthusiastic start with WTP.


Geronimo server failed to start

One problem is that the end user is given the expectation that it can download, install and run additional runtimes automagically. The additional runtimes dialog presents us with a list of available runtimes decorated with their logos. It gives the impression that this is "something that Eclipse can do". The expectation however is far from the reality, and the real issue is obviously with the third party plugins that are downloaded and not so much with WTP.

Conclusion

Some of the server runtime plugins supplied by third parties have problems with (this version of) Eclipse. I was never able to get them to work well or work at all with Europa, and they exhibit problems with this newer Ganymede release as well. So what good is a simultaneous release of the JEE bundle if there is no good support from the third party application servers such as e.g. Geronimo? Why provide fancy options to install stuff that just leads to disaster? What about the willingness and/ or ability of the third party vendor/ community to put effort in getting these plugins to work (in time for the release)? Getting the plugin providers to be part of the simultaneous release is very likely to be a bridge too far.


Trying to get Geronimo to work eventually broke my update manager to the point I had to reinstall Eclipse (clean start didn't help...)

JBoss does not work well either, but this post is getting too long, so I'll go into more details on that in the next one. I've still got many other thoughts on this as well and I intend to add them in a "grand conclusion" of my reviews of Ganymede RC2.


Tuesday, June 10, 2008

Eclipse Ganymede RC2 Data Tools

This post is one of a number of reviews of the upcoming Eclipse Ganymede release. It has been added to the Ganymede Around the World map. Donate and become a Friend of Eclipse!

More Eclipse Ganymede RC2 stuff reviewed, more stuff to blog about, and once again something I really appreciate! I was giving a Java basics course and got to the point of explaining JDBC, iBatis and PostgreSQL. For this course, I could not get the data tools to work with my postgres (8.3.1) database install. Adding the connection and pinging the database worked, but trying to navigate the database in the data source explorer failed miserably. This might have been an issue specific to (this version of) PostgreSQL, but to me it was yet another one of those things that didn't work with Europa. It forced me to switch between Eclipse and psql/ pgAdmin to run the scripts I had created in Eclipse, copying and pasting as I went along.

With Ganymede I have not only been able to add and ping my postgres 8.3.1 databases, I was able to browse them as well! It just works (TM), out of the box (R)! Now I can also set the connection info on my SQL scripts and execute them from within Eclipse: Just right click a .sql file and select "Execute SQL Files". Excellent!! One minor remark is that I would have expected to be able to run the SQL queries from the "Run" toolbar button (the first place I went looking). I'll check and see if a bugzilla exists, and if not, I'll register it as an enhancement and see if this is something worth adding in the future.


Browsing the PostgreSQL database structure

The SQL execution engine does not understand the psql specific \i syntax for including external files, but that's understandable as these queries are fired to the database via JDBC and not via psql. The \i is something psql knows about, the server does not, nor does DTP. As I use \i for my scripts to run in the correct order, I will have to find a way around this or try something completely different. For this one I will also check and see if an "include file" (not necessarily using a \i syntax) bugzilla exists. Again, if not, I'll create one and check if people care about such a thing.


SQL editor connected to a database


Conclusion

Besides these minor usability issues, I am again pleasantly surprised by something that is working rather than not. Like I said in my previous post, I have great hopes that this release will be in many ways more mature than the Europa bundle. I am starting to become more and more enthusiastic the more I use Ganymede! Another case deserving two thumbs up!

Some other things I've already been fiddling around with are the web tools, getting Tomcat to work and run a simple web application. So for my next post I'll have a closer look into WTP and see if this time I will be more successful installing, running and deploying to "Geronimoooooo!!!!!" ;-)


Monday, June 09, 2008

Eclipse Ganymede RC2 First Impression

This post is one of a number of reviews of the upcoming Eclipse Ganymede release. It has been added to the Ganymede Around the World map. Donate and become a Friend of Eclipse!

Update regarding Subclipse and Ganymede (June 29th): It seems that a lot of traffic is landing on this page via Google regarding this topic. If you landed here because you are having trouble getting Subclipse to work, you may want to check this article.

The good folks over at Eclipse want reviews of the Ganymede release candidate. Now that's an excellent motivation to download and start using this new version of Eclipse. So without further ado, here's a hands on review of the new Ganymede RC2 build.

After downloading and unpacking the JEE bundle, I started Eclipse with my old workspace to see how the workspace migration would fare. All my Java projects are there, so that's a good sign. It could not fully restore the workbench layout though due to missing plugins that I did not install yet. My bad, time to install the missing Subversion plugin first. The other missing plugin, a LDAP browser, can wait. Setting the proxy now supports the use of the system proxy, a very welcome feature!

The software update and plugin install system has changed. This new system looks good. It is easy to use and get used to. Just go to "Available Software" and "Add Site...". The site configuration only allows for a URL, no longer a name. Entering http://subclipse.tigris.org/update_1.2.x adds the Subclipse update site. I now get an error about Buckminster, it looks like the Buckminster integration repository is gone.


Buckminster error

I also get to see the "Integrations (Optional)" and "Subclipse Plugin" twice. Removing the SVN site and adding it again solves the latter problem. The buckminster error disappeared as well. Checking Subclipse and Mylyn integration, and install!


Strange behavior after the Buckminster error, features are shown twice

Getting the plugin to work without restart causes some problems. I still have the old perspective button, and it is not functioning properly. After a restart, the perspective works (guess I am pushing my luck applying changes on the fly). Getting rid of the LDAP browser perspective button reveals some quirks as well. The "Close" menu on the perspective's button does not work, but I am able switch to it and then close it via the "Window" menu. Weird, but nothing too spectacular.

Checking my Mylyn tasks, I see that I am missing the Trac task repository that I had configured. This is probably due to the fact that the Trac connector is not there yet, so let's install that as well. This is where it gets a bit confusing. The installed software says I have Mylyn 3.0.0, but in the available software I only see version 2.3.2 for Eclipse 3.4. I wouldn't want to downgrade, so let's add the weekly Eclipse 3.4 update site then and see what happens.

After adding http://download.eclipse.org/tools/mylyn/update/weekly/e3.4 and selecting the Mylyn stuff I need, I get the message that my original request was modified, saying things like: "Feature X is already installed, so an update will be performed instead." Great! It will update my existing install with the Mylyn weekly updates! After installation the Trac repository from my old workspace automagically appears, together with the queries I had defined.


Mylyn back in business, old repositories and queries are restored

Java coding adds a range of small but very handy great time saving features, such as the string concatenation to string buffer conversion quick fix, automatic casts in the code completion, a quick fix for getter and setter generation, etc. The breadcrumb feature gives a means to browse source code with full screen editors, so no need to unmaximize to get to the package explorer, and then maximizing again. I can also imagine that this will work well for those who have smaller displays.


Showing off Mylyn active task focus and the String to StringBuffer conversion


Conclusion

This is just a first impression of Ganymede RC2 and I have just converted my old workspace, performed some basic tasks and tested some of the new features. I did run into some quirks here and there, but my overall impression so far is quite good. I was afraid that featurism combined with the daunting task of delivering this combined release would result in below par quality, but I am proven wrong so far. I have not (yet) run into major show stoppers. So there's hope that this release will be a step forward as far as the maturity of the various bundled components is concerned. There are no major changes in the appearance, and that is just fine with me. Java coding works pretty much the same, so I can pick up where I left in my old workspace. Add the time savers to that, and I am a happy coder.

So where is all this going? I have only touched a very small part of what is becoming a huge beast. Eclipse has come a long way ever since I started using version 2. At first it was yet another IDE, now it is a full fledged enterprise application development environment (if you wish, that is!). I have been very, very impressed with Mylyn. I have been using it since the very first release and it's great that it allows you to focus on the task and its associated resources at hand. Being part of an open platform itself, Mylyn integrates with other open platforms such as Trac. I am trying to setup Trac for task tracking and project management. The Trac connector brings all this task management straight into the development environment itself. So besides this beast becoming more technology and enterprisey, it also has the potential of becoming a true collaborative development platform that is connected via the web.

Eclipse has always been my favorite IDE ever since version 2, and by the looks of Ganymede it'll be my favorite IDE for many more years to come. Two thumbs up and let's hope this simultaneous release is going to be a huge success!


Saturday, May 03, 2008

Open Source SWIFT Parser in Java

I have more than once in the past tried to find an open source SWIFT message parser. There are some defunct/ idle projects (one MT94X parser, jSWIFT, SWIFT Message Parser in Java) and some import/ export components that are part of larger projects (e.g. gnucash). I have now stumbled upon a proper stand alone and open source (LGPL) SWIFT message parser called WIFE.

WIFE is written in Java and sports parsing all message categories and service messages into a message model (message, blocks, tags). This model can be written to a SWIFT message. WIFE also supports converting to and from a (albeit non-standard) XML format and persisting messages using Hibernate. Interesting find! Might come in handy for some projects.

Monday, November 26, 2007

Deploying Web Applications Outside the Tomcat Install Directory

Suppose you have Tomcat installed somewhere, e.g. /opt/tomcat6 or /usr/local/tomcat5. Now you want to give users the ability to deploy their applications and start/ stop the Tomcat server if needed (e.g. in case of an unrecoverable crash of the Tomcat server). You can start modifying the Tomcat install directory to support multiple users (e.g. in a given group) to write in the webapps directory and to be able to deploy context files under conf and maybe add dummy users to the tomcat-users.xml to test authentication. But that is breaking open the main Tomcat install directory and potentially allowing users to break things. Another drawback is that having a single instance will cause all applications running on this instance to be unavailable if the server is shut down.

I will describe an alternative way of supporting multiple users using the Tomcat install, by means of each user/ application having its own server. The drawback of this approach is that multiple port numbers are needed and this requires a bit of coordination between users. The advantages however are that not a single change is needed in the Tomcat installation directory whatsoever, users can start stop their own instances without impacting other users/ applications and .

First you'll need a strategy of where to put the user's or application's Tomcat stuff. You could use /app or /opt, e.g. /app/user1, /app/user2, /opt/application1, etc. /app might be a better choice as some software installs in /opt and this could potentially cause the user's/ application's Tomcat stuff to be mixed with other software that you may or want to have installed in /opt. In this example we will have Tomcat 6 installed in /usr/local/tomcat6 and use /app for the applications. We will have two applications, acmeweb (Acme corporation's E-Business website) and acmehr (Acme corporation's human resources application). Create users acmeweb and acmehr with groups acmeweb and acmehr respectively and set their passwords:

adduser --system --shell /bin/bash --group acmeweb
adduser --system --shell /bin/bash --group acmehr
passwd acmeweb
passwd acmehr


Underneath /app create the acmeweb directory. Underneath acmeweb, create the directories bin, conf, webapps, temp, work and logs:

mkdir -p /app/acmeweb
cd /app/acmeweb
mkdir bin conf webapps temp work logs


Copy the following Tomcat scripts to bin:

cd /usr/local/tomcat6/bin/
cp startup.sh shutdown.sh setclasspath.sh catalina.sh /app/acmeweb/bin


Copy the following Tomcat configuration files to conf:

cd ../conf
cp server.xml web.xml /app/acmeweb/conf


Recursively copy /app/acmeweb to /app/acmehr:

cd /app
cp -R acmeweb acmehr


Recursively change ownership of the directories to the proper user and group:

chown -R acmeweb.acmeweb acmeweb
chown -R acmehr.acmehr acmehr


Set the user to acmeweb and create a .profile:

su - acmeweb
vi .profile


Put the following contents in the .profile:

export JAVA_HOME=/usr/local/java6
export CATALINA_HOME=/usr/local/tomcat6
export CATALINA_BASE=/app/acmeweb


Logout and set user to acmeweb again. Edit /app/acmeweb/conf/server.xml:

ctrl-d
su - acmeweb
vi /app/acmeweb/conf/server.xml


Modify the server, AJP and HTTP connector ports and change them to 20105, 20109 and 20180 respectively (you may also consider turning off the AJP connector altogether):

<Server port="20105" shutdown="SHUTDOWN">
...
<Connector port="20180" protocol="HTTP/1.1"
           connectionTimeout="20000"
           redirectPort="8443" />
...
<Connector port="20109" protocol="AJP/1.3" redirectPort="8443" />


Create a ROOT context, add an index.html to the context and start Tomcat:

cd /app/acmeweb
mkdir webapps/ROOT
echo Acme Web > webapps/ROOT/index.html
bin/startup.sh


Logout as the acmeweb user, set the user to acmehr and create a .profile:

ctrl-d
su - acmehr
vi .profile


Put the following contents in the .profile:

export JAVA_HOME=/usr/local/java6
export CATALINA_HOME=/usr/local/tomcat6
export CATALINA_BASE=/app/acmehr


Logout and set user to acmehr again. Edit /app/acmehr/conf/server.xml:

ctrl-d
su - acmehr
vi /app/acmehr/conf/server.xml


Modify the server, AJP and HTTP connector ports and change them to 20205, 20209 and 20280 respectively (you may also consider turning off the AJP connector altogether):

<Server port="20205" shutdown="SHUTDOWN">
...
<Connector port="20280" protocol="HTTP/1.1"
           connectionTimeout="20000"
           redirectPort="8443" />
...
<Connector port="20209" protocol="AJP/1.3" redirectPort="8443" />


Create a ROOT context, add an index.html to the context and start Tomcat:

cd /app/acmehr
mkdir webapps/ROOT
echo Acme HR > webapps/ROOT/index.html
bin/startup.sh


Open a browser and connect to the IP address of your Tomcat server, ports 20180 and 20280:

http://<tomcat server ip address>:20180/
http://<tomcat server ip address>:20280/


The first should display Acme Web in your browser, the second Acme HR. Both instances are running under their own user, these users can restart their own instance of Tomcat and the configuration of the server can be done by those users:

acmeweb 5295 1 0 23:02 ? 00:00:04 /usr/local/java6/bin/java -Djava.endorsed.dirs=/usr/local/tomcat6/endorsed -classpath :/usr/local/tomcat6/bin/bootstrap.jar:/usr/local/tomcat6/bin/commons-logging-api.jar -Dcatalina.base=/app/acmeweb -Dcatalina.home=/usr/local/tomcat6 -Djava.io.tmpdir=/app/acmeweb/temp org.apache.catalina.startup.Bootstrap start

acmehr 5333 1 0 23:05 ? 00:00:03 /usr/local/java6/bin/java -Djava.endorsed.dirs=/usr/local/tomcat6/endorsed -classpath :/usr/local/tomcat6/bin/bootstrap.jar:/usr/local/tomcat6/bin/commons-logging-api.jar -Dcatalina.base=/app/acmehr -Dcatalina.home=/usr/local/tomcat6 -Djava.io.tmpdir=/app/acmehr/temp org.apache.catalina.startup.Bootstrap start


In this setup the main Tomcat install directory in /usr/local/tomcat6 remains untouched. The trick is setting the CATALINA_HOME to the tomcat install in /usr/local/tomcat6 and CATALINA_BASE to the user specific Tomcat directory in /app/acmeweb and /app/acmehr.

Monday, November 19, 2007

Method Name in the URL File Name with Spring MVC's MultiActionController

Spring's MultiActionController is great for allowing a single controller to be able to handle multiple types of requests. What method to dispatch to is determined based on the method name resolver. You have several options here. E.g. with the ParameterMethodNameResolver you specify what method to call in the request parameters. You can specify that a certain request parameter, e.g. action, is going to contain the method name to dispatch to:

http://localhost:8080/app/someController.do?action=someMethod

The InternalPathMethodNameResolver resolves the controller from the path and the method from the file name without extension, e.g. the following URL would cause someMethod to be called on the controller. It basically strips the file name from the path (the part after the last slash) and strips the extension (.do):

http://localhost:8080/app/someController/someMethod.do

The PropertiesMethodNameResolver allows you to specify the method in a "value of the page" kind of way. E.g. you have someController.do and you add =someMethod to the URL in order for it to resolve to the controller and the method that is to be called:

http://localhost:8080/app/someController.do=someMethod

Besides the above strategies, one could also imagine a strategy where both the controller and the method are passed in the file name part of the path. The construct would contain the name of the controller, e.g. someController, suffixed with what method to call, e.g. .someMethod, suffixed with the extension, in this case .do:

http://localhost:8080/app/someController.someMethod.do

The above can also be extended to support dispatching to a default method in case no method name was given, e.g. one could specify someMethod to be the default and then call:

http://localhost:8080/app/someController.do

Spring does not have support for this scheme, but it can be easily extended to do so and this article will show how. The first thing to do is setup the web.xml file of your web application (I have created a dynamic web project in Eclipse 3.3 called SpringTests, so replace any references to this project with references to your own). First register the DispatcherServlet. In the example below the DispatcherServlet is registered under servlet name mvc:

<servlet>
  <servlet-name>mvc<servlet-name>
  <servlet-class>
  org.springframework.web.servlet.DispatcherServlet
  <servlet-class>
  <init-param>
    <param-name>contextConfigLocation<param-name>
    <param-value>
    classpath:com/acme/mvc.xml
    <param-value>
  <init-param>
  <load-on-startup>1<load-on-startup>
<servlet>


Please note in the above snippet the location of the Spring configuration file. It is on the classpath in com/acme/mvc.xml, so unless you are making an exact copy of the setup described here, refer to your Spring configuration file that is going to have the URL mappings of the DispatcherServlet. Next step is to add the servlet mapping. To stay inline with the example scenarios described we will map *.do to our mvc servlet:

<servlet-mapping>
  <servlet-name>mvc<servlet-name>
  <url-pattern>*.do<url-pattern>
<servlet-mapping>


The next thing we will need to do is create and register a controller. For this example, we will use a very simple controller called MyController that will have just two methods and that writes what method was called to the output stream. In our source folder we create a new package, com.acme, and add the MyController class. We will also be using the com.acme package to contain our Spring configuration file, mvc.xml:

package com.acme;

import java.io.IOException;
import java.io.PrintWriter;

import javax.servlet.http.HttpServletRequest;
import javax.servlet.http.HttpServletResponse;

import org.springframework.web.servlet.mvc.multiaction.MultiActionController;

public class MyController extends MultiActionController {

  public void defaultMethod(HttpServletRequest request,
    HttpServletResponse response) throws IOException
  {
    PrintWriter pw = new PrintWriter(response.getOutputStream());
    pw.print("Default method was called");
    pw.flush();
  }

  public void nonDefaultMethod(HttpServletRequest request,
    HttpServletResponse response) throws IOException
  {
    PrintWriter pw = new PrintWriter(response.getOutputStream());
    pw.print("Non default method was called");
    pw.flush();
  }
}


We will now create the mvc.xml file, which will register our controller, contain the DispatcherServlet URL mapping to our controller, but also the necessary configuration for our custom method name resolver class. First we will register our controller. Please note that we specify a methodNameResolver as being the defaultUrlMethodNameResolver. This will be a reference to our custom method name resolver which we will need to implement once we are done configuring. It is injected in our controller's methodNameResolver property (which is a property of MultiActionController), and any attempt to resolve which method name is to be used will be sent to our own implementation:

<bean id="myController" class="com.acme.MyController">
  <property name="methodNameResolver"
            
ref="defaultUrlMethodNameResolver" />
<bean>


The next step is to configure the method name resolver to point to our DefaultUrlMethodNameResolver class, which we will create later on in the com.acme package. We inject a default method into our method name resolver. This property will be used to return a default method name in case the URL does not contain one (e.g. someController.do). In our example we want the default method name to be defaultMethod:

<bean id="defaultUrlMethodNameResolver"
      class="com.acme.DefaultUrlMethodNameResolver">
  <property name="defaultMethod"
            
value="defaultMethod" />
<bean>


Now we add the URL mappings for the DispatcherServlet and map myController URL's to the myController bean. Note that we map to myController.* and not myController.*.do as the latter will force us to always specify a method name as it forces two dots in the file name. E.g. myController.do will fail as it does not match the latter pattern. The former pattern matches with both myController.do and myController.someMethod.do. Not adding the .do part in the pattern is not a big deal, as *.do is already configured in the servlet mapping in the web.xml above, meaning that not supplying the .do on the URL would not have been handled by the DispatcherServlet anyways.

<bean id="urlMapping"
  
class="org.springframework.web.servlet.handler.SimpleUrlHandlerMapping">
  <property name="mappings">
    <props>
      <prop key="/myController.*">myController<prop>
    <props>
  <property>
<bean>


We now get to the actual implementation of the method name resolver. We create the DefaultUrlMethodNameResolver in the com.acme package. As we want to inject a default method name we will need to have the defaultMethod property and a setter for this property. We will also need to implement the MethodNameResolver interface and implement the getHandlerMethodName method:

package com.acme;

import javax.servlet.http.HttpServletRequest;

import org.springframework.web.servlet.mvc.multiaction.MethodNameResolver;
import org.springframework.web.servlet.mvc.multiaction.NoSuchRequestHandlingMethodException;

public class DefaultUrlMethodNameResolver implements MethodNameResolver {

  private String defaultMethod = null;

  public String getHandlerMethodName(HttpServletRequest request)
    throws NoSuchRequestHandlingMethodException
  {
    String path = request.getServletPath();
    String[] pathParts = path.split("\\.");
    if (pathParts.length > 2) {
      if (!"".equals(pathParts[1])) {
        return pathParts[1];
      } else {
        return defaultMethod;
      }
    } else {
      return defaultMethod;
    }
  }

  public void setDefaultMethod(String defaultMethod) {
    this.defaultMethod = defaultMethod;
  }
}


The above code splits the file name on the dot. The path parts array contains the different segments of the file name. If the size of the array is greater than two, we know that we have at least three parts in the file name, the first part being the controller name, the second the method name and the third being .do. We therefore return the second element of the array as the method name (pathParts[1]), unless this element were to be empty, in which case we return the default method (this is in order to handle e.g. myController..do). If we had only two elements in the array, we have something like myController.do and thus return the default method. We can now run this web application on a server and try out a couple of URL's to see how it works.

http://localhost:8080/SpringTests/myController.do results in "Default method was called".

http://localhost:8080/SpringTests/myController..do results in "Default method was called".

http://localhost:8080/SpringTests/myController.defaultMethod.do results in "Default method was called".

http://localhost:8080/SpringTests/myController.nonDefaultMethod.do results in "Non default method was called".

So here we have a strategy that allows both the controller and the method name to dispatch to in the file name part of the URL.

Sunday, October 28, 2007

Mapping PostgreSQL Arrays with iBATIS

I needed to map a PostgreSQL integer array column to a Java integer array using iBATIS. The following is what seems to do the trick. Suppose you have a table with an integer array:

create my_table (
  id integer primary key,
  array_column integer[]
);

And some data was inserted using e.g. the following insert statement:

insert into my_table (id, array_column) values (1, array[1, 2, 3]);

Now lets have a Java class that can map to the above table, as follows:

public class MyTable {

  private int id = 0;
  private int[] arrayColumn = null;
  
  public int getId() { return id; }
  public void setId(int id) { this.id = id; }
  public int[] getArrayColumn() { return arrayColumn; }
  public void setArrayColumn(int[] arrayColumn)
    { 
this.arrayColumn = arrayColumn; }
  
}

We will now specify a select map, and we pass a result map to the select which is going to contain the mappings from the various columns to the properties in the Java bean.

<select id="getMyTable" parameterClass="int" resultClass="MyTable"
        resultMap="myTableResult">
    select id, array_column from my_table where id = #id#
</select>

The result map that we refer to in the resultMap attribute in the above select map is specified below:

<resultMap id="myTableResult" class="MyTable">
    <result property="id" column="id" />
    <result property="arrayColumn" column="array_column" jdbcType="ARRAY"
            
javaType="java.sql.Array" typeHandler="ArrayTypeMapper" />
</resultMap>

In this result map, we map the id column to the id property and the array_column column to the arrayColumn property. There is however additional configuration needed for this second mapping. We specify that the JDBC type is ARRAY (as in java.sql.Types.ARRAY). We also specify that the Java type is java.sql.Array, but more importantly we specify the typeHandler attribute, which refers to the handler that is going to handle this array, and it is called ArrayTypeMapper. It implements TypeHandlerCallback, and its contents are as follows:

import java.sql.Array;
import java.sql.SQLException;

import com.ibatis.sqlmap.client.extensions.ParameterSetter;
import com.ibatis.sqlmap.client.extensions.ResultGetter;
import com.ibatis.sqlmap.client.extensions.TypeHandlerCallback;

public class ArrayTypeMapper implements TypeHandlerCallback {

  public void setParameter(ParameterSetter setter, Object parameter
        throws SQLException {
    throw new UnsupportedOperationException("Not implemented");
  }

  public Object getResult(ResultGetter getterthrows SQLException {
    Array array = getter.getResultSet().getArray(getter.getColumnName());
    if (!getter.getResultSet().wasNull()) {
      return array.getArray();
    else {
      return null;
    }
  }

  public Object valueOf(String s) {
    throw new UnsupportedOperationException("Not implemented");
  }
}

It is very convenient that the getter object has the column name available (so we can avoid having to explicitely name the column or use indexes). Do not get the array from the array object immediately, you should first check whether is was null. If that was the case, return null (causing the MyTable object's array to be set to null), otherwise return array.getArray(). This will automatically cause the int[] in MyTable to be filled with the contents of the array column of my_table.

Saturday, October 20, 2007

Smart Version Class with Version Increment Validation and Suggestion

For a build management system I am working on, I want a smarter way of doing version numbering for versioned builds. Right now a user can enter any version number, but I would like the system to suggest a next version number. E.g. if the last versioned build had a version number 1.2.3, I would like the system to suggest 1.2.4 as next version number when a new versioned build is started. I would also like to give a warning when a user tries to go from 1.2.3 to 1.2.5, skipping a number.

For this I have created a "smart" version class that works with numerical version numbers only and that can have any amount of version digits. Such version numbers include 1.2.3, 2.1.0, 2.33.24.18.65, etc. Valid transitions of one version number to another are from 1.2.3 to 1.2.4, 1.2.3 to 1.3.0, 1.2.3 to 1.2.3.0, 1 to 2, 1.2.3 to 2, 1.2.3 to 2.0, 1.2.3 to 2.0.0, 1 to 2.0, 2.0 to 3. The basics of this smart version class is an integer array, although that is quite the overkill, and a byte would probably have been enough (640KB anyone?). The constructor of this class takes an integer array, and per version class I want the array to become immutable (if you need a new version, instantiate a new version object).

public class Version {

  private final int[] versionDigits;
  
  public Version(int[] versionDigits) {
    if (versionDigits == null) {
      throw new IllegalArgumentException("versionDigits is null");
    }
    if (versionDigits.length == 0) {
      throw new IllegalArgumentException("versionDigits length is 0");
    }

    this.versionDigits = versionDigits;
  }

To complement the foundation, a helper method is added that is able to parse a version string such as "1.2.3" into an array of digits. This just makes our life easier when we have version strings and want to convert them into a version object. This is done by the parse method.

  public static Version parse(String versionString) {
    if (versionString == null) {
      throw new IllegalArgumentException("versionString is null");
    }
    
    StringTokenizer st = new StringTokenizer(versionString, ".");
    int[] versionDigits = new int[st.countTokens()];
    int i = 0;
    while (st.hasMoreTokens()) {
      versionDigits[i++= Integer.valueOf(st.nextToken()).intValue();
    }
    return new Version(versionDigits);
  }

Now we will get to the interesting stuff. The following method checks whether a transition was a valid one and returns true if so, otherwise false.

  public boolean isValidNextVersion(Version newVersion) {
    int i = 0;
    for (; i < versionDigits.length; i++) {
      if ((newVersion.getVersionDigits()[i- versionDigits[i]) == 1) {
        i++;
        break;
      else if (newVersion.getVersionDigits()[i!= versionDigits[i]) {
        return false;
      else if ((i + 1== newVersion.getVersionDigits().length) {
        return false;
      }
    }
    for (; i < newVersion.getVersionDigits().length; i++) {
      if (newVersion.getVersionDigits()[i!= 0) {
        return false;
      }
    }
    return true;
  }

The above method deserves some explanation. It goes through all the digits and first checks whether the difference is positive one (new digit - old digit = 1). If that's the case, then we have found the one digit that changed and that it had increased with one. We will then need to increase the position in the array with one, break out of the initial loop and start checking whether the remainder of digits are zero in the new version number. E.g. if the second digit in 1.2.3 was increased by one, the resulting version number must be 1.3.0.

If there was no difference of one, then the new digit and the old digit must be the same (e.g. in the case of the second digit in 1.2.3 to 1.2.4). If that is not the case (new digit != old digit), we know one of the digits did an invalid transition, e.g. from 1.2.3 to 1.4.0, and we can safely return false.

The last condition in the first loop checks whether the next run in the loop would cause the array index to be out of bounds for the new version number. As the first check did not break yet, we are pretty confident that the version number remained the same, e.g. from 1.2 to 1.2, or went backward losing digits, e.g. from 1.2.3 to 1.2. The condition that the old version number has less digits than the new version number is already covered by the fact that the first for loop loops through the digits of the old version number.

The second loop in the method just checks whether all remaining digits in the new version number are zeros. If that is not the case, we would have gone from e.g. 1.2.3 to 1.2.3.1 or 1.2.3 to 1.2.4.1. Return false if that's the case for any of these digits, else we can safely say the version number transition was valid and return true. As a bonus we can implement a method that suggests a new version. Because we do not want the old version number's digits to be touched, we first create a getVersionDigits method that returns a copy of the internal array:

  public int[] getVersionDigits() {
    int[] newVersionDigits = new int[versionDigits.length];
    System.arraycopy(versionDigits, 0, newVersionDigits, 0,
        versionDigits.length
);
    return newVersionDigits;
  }

The method that suggests the new version will actually return a new version object with the suggested version digits. This is done by calling the getVersionDigits method, increasing the last digit of that array by one and returning a new version number object with the given array, e.g. in the case of 1.2.3 the suggested new version is 1.2.4. Variations on this theme could include a mechanism that suggests valid transitions for any of the digits, e.g. in the case of 1.2.3 the new suggested version number would be 1.3.0.

  public Version getNextSuggestedVersion() {
    int[] newVersionDigits = getVersionDigits();
    newVersionDigits[newVersionDigits.length - 1]++;
    return new Version(newVersionDigits);
  }
}

This class is in no way set in stone. Variations on this class could be returning the position of the invalid digit transition (e.g. digit 2 did an invalid transition) or something that gives back reason codes as to why a transition was invalid (e.g. numbers are the same, new version is smaller than old version, etc.), or the ability to specify whether version numbers are zero based or one based (e.g. making 1.2.3 to 1.2.4.1 a valid transition and suggesting version numbers likewise). Maybe it is desirable to have something like a suffix as well, and requiring the suffix to change if the version number remains the same (e.g. 1.2.3 RC1, 1.2.3 final, etc.).

This can all be put into place in the code shown above. At least this class is a starting point that takes care of the nitty gritty details of the algorithm that does the validation on the version digit transitions. Although something like validating version transitions sounds simple, suffice to say my initial attempt consisted of 6 for loops and 24 if branches and that I am very happy to have been able to bring this down to what I have now.

Wednesday, October 18, 2006

Duplicate Form Submissions

Introduction


In web applications, sometimes when a user submits a form and it takes very long for the form to be submitted, a user will tend to click on the submit button again. This can cause for dupes to appear in the application, e.g. submitting the same payment twice (sorry for my financial background...), uploading the same file twice, etc.


There are two ways of avoiding this. The first involves writing server side code that spawns threads that check whether the exact same request is submitted again. The problem with this approach is that it involves spawning threads inside the server, an undesirable and sometimes even disallowed practice (e.g. J2EE application server security policy disallows spawning threads).


The other solution, found on the web, is to use JavaScript to disable the buttons on submit and reenable them after e.g. 60 seconds using the setTimeout function. It is then impossible for the user to click on the button twice. I saw a problem with this however. What if a user wants to stop submitting by clicking the browser stop button? Obviously, after 60 seconds, the buttons will be reenabled again. But why wait for 60 seconds? The user clicked stop and now the submit button is disabled for a long period of time.


A solution would be to keep the button disabled as long as the page is loading. If the user clicked the browser stop button, reenable the submit button again. Variations on this could include showing message boxes warning the user.

The Client


Testing revealed that using the onstop and onreadystatechanged events don't work, as they only fire from a page that has loaded, they do not fire when another page is loading. For this reason, the setInterval method is used to start a "checker process" that checks if the browser stopped loading the other page. Below is a simple HTML page that includes the basics of reenabling as soon as the user clicks stop:


<head>
<script language="JavaScript">
traps = 0;
timerId = 0;

function catchDC() {
if (traps > 0) {
return false;
} else {
timerId = setInterval("handleStop();", 100);
traps++;
document.forms[0].submit();
}
}

function handleStop() {
if (document.readyState == 'complete') {
traps = 0;
clearInterval(timerId);
}
}

</script>
</head>
<body onload="javascript: trap = 0;">
<form method="POST" action="http://127.0.0.1:9999/">
<div onclick="javascript: return catchDC();">Click</div>
</form>
</body>
</html>

In the above code, a fictional server (sample code below) is called when the "Click" div is clicked. Function catchDC checks if the user had already clicked the "Click" button by checking if steps variable is greater than zero. If this is the case, the event is cancelled and the submit is not executed twice. One could also display a message box to the user when this happens, warning him not to do this.


If the form was not submitting, a timer is started with an interval of 100 msecs. This timer calls handleStop every 100 msecs, and this function checks the document.readyState to see if it is still loading or if the user had clicked the browser stop button (which would cause the readyState to be set back to complete).


If the user clicks the browser stop button, in the handleStop function called every 100 msecs the variable steps is set back to zero, essentially reenabling the "Click" div again. One could also set steps to a different value, which could then be used to determine if the user had clicked the div before and if so, issue a warning explaining the risk of duplicates and asking the user if he/ she really wants to submit again (are you sure? yes/ no...).

The Server


Below is a simple sample server that accepts a socket and then waits for ten seconds before closing the socket again. This will cause the web browser to stall, giving you enough time to test the double click (or triple or etc.) and to click the stop button and find out that this causes the "Click" button to work again. The server writes "Ding dong!" to stdout for every call made from the browser to the server:

package tst;

import java.io.IOException;
import java.net.ServerSocket;
import java.net.Socket;

public class Servertje extends Thread {

private Socket s = null;

public Servertje(Socket s) {
this.s = s;
}

/**
* Main
* @param args argh!
* @throws IOException on error
*/
public static void main(String[] args) throws IOException {
ServerSocket ss = new ServerSocket(9999);
while (true) {
Socket s = ss.accept();
Servertje servert = new Servertje(s);
servert.start();
}
}

public void run() {
try {
System.out.println("Ding dong!");
Thread.sleep(10000);
s.close();
} catch (InterruptedException e) {
e.printStackTrace();
} catch (IOException e) {
e.printStackTrace();
}
}

}